MIDI Clip Launcher
The clip launcher records and plays back MIDI sequences on each output row. Drop in any MIDI file, edit it in the piano roll, trigger it from your keyboard, and optionally reharmonize the entire sequence to match the chords you play.
Drop Zones
Each output row has 12 drop zones per keyswitch, giving you 12 independent clip slots that can be loaded, triggered, and configured separately.

Each keyswitch can have its own set of clips per row—switch keyswitches to access different clip arrangements while keeping the same instruments loaded.
Loading and Editing Clips
Navigate to the Clip Launcher page. For each output row, drag and drop MIDI files into any of the 12 drop zones. Clips are stored within the preset and recalled per keyswitch.
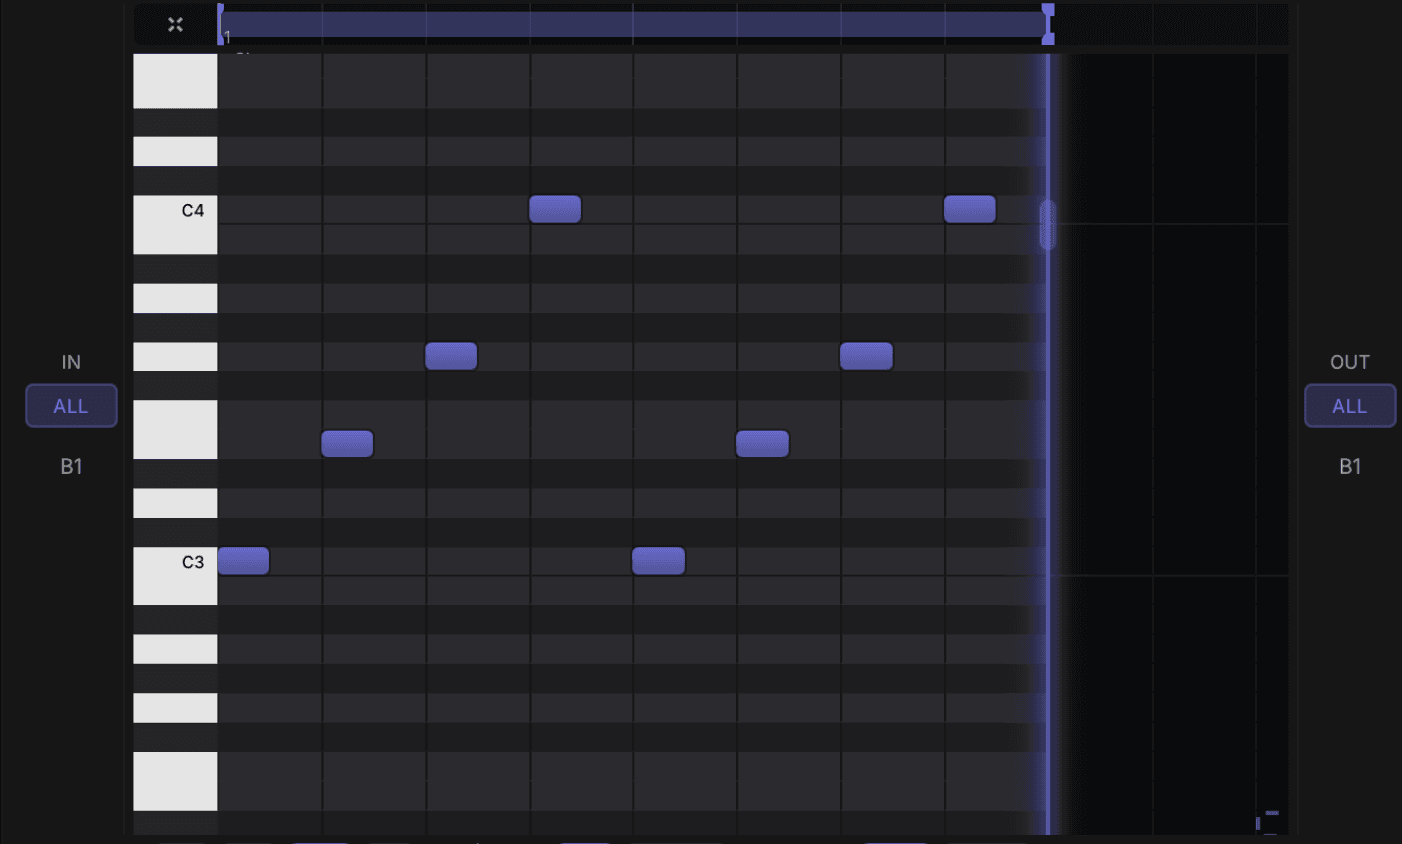
Piano Roll Editor
After dropping a clip, use the built-in piano roll to edit notes directly in the plugin. Add, delete, move, and resize notes. Adjust velocities. Tweak timing. No need to switch to your DAW—edit clips in place.
Recording Into a Clip
A row can be armed for direct clip recording. In plugin mode, recording follows the host transport: start playback to capture the row, then stop the transport to create a pending take. Load that take into a clip slot from the Clip Launcher.
- •Use the down-arrow control to drop the recorded take into the piano roll for the selected clip slot.
- •While a row is armed, normal clip playback for that row is suppressed so you can monitor the input through the row chain.
- •The loaded clip is note-based editable MIDI. Do not rely on arbitrary imported CC data surviving as editable clip data.
Trigger In
Trigger In determines which note on your keyboard triggers the clip to play:
- •Assign a specific MIDI note to launch the clip
- •Press that note—the clip starts playing
- •Different clips can have different trigger notes, so you can switch between patterns
In Arpeggiation Mode: The trigger note still launches the clip, but the clip launcher accepts all notes to determine the clip's harmony. The trigger is just what starts playback—the chord you're holding determines what pitches play.
Trigger Out
Trigger Out controls how the clip's notes are output to the instrument:
Fixed (Single Note)
Forces the entire pattern to play on a single note. All pitches in the clip are collapsed to one output note. Perfect for percussion—play a complex rhythm pattern that always triggers the same drum hit.
All
Allows the pattern to play with its original or reharmonized pitches. Use this for melodic content where you want the full range of notes.
Loop and One-Shot Mode
Control how clips play after being triggered:
Loop
The clip repeats indefinitely after the trigger. Release the trigger or send a stop message to end playback. Use for continuous patterns, ostinatos, or evolving textures.
One-Shot
The trigger sets the clip playing in full—it plays through once from start to finish, then stops. Use for fills, hits, risers, or any pattern that should play completely and not repeat.
Arpeggiation Mode
Arpeggiation mode transforms the clip launcher into a powerful reharmonization tool:
When enabled, the MIDI sequence is collapsed to a phrase shape—the rhythmic pattern and contour of the original clip are preserved, but the actual pitches are replaced by notes from the chord you're playing.
- •Play a chord—the clip's phrase is reharmonized to fit your harmony
- •Change chords—the phrase follows, staying musically coherent
- •Coordinates with the rest of the plugin—the revoiced notes flow through voice layers and the routing matrix
Example: Import a complex string phrase. Enable arpeggiation mode. Now when you play C major, the phrase plays in C major. Play A minor—the same phrase, same rhythm, but reharmonized to A minor. The melodic contour is preserved while the harmony follows your playing.
Parameters
| Parameter | Description |
|---|---|
| Trigger In | The MIDI note that starts playback of this clip. |
| Trigger Out | Fixed — collapses output to single note. All — plays full pitch range. |
| Trigger Mode | Loop — repeats indefinitely. One-Shot — plays through once then stops. |
| Release Window | Controls how clip playback responds around trigger release. |
| Arpeggiation Mode | Collapses the clip to a phrase shape, reharmonizing it based on incoming chords. |
| Sync Mode | How the clip quantises its start to the host transport. |
| Loop Start | Beat/step position within the clip where the loop point begins. |
| Active Steps | Number of steps the clip plays before looping. |
| Clip Length | Total length of the clip in steps. |
| Speed | Playback speed relative to host tempo (e.g., ×1, ×2, ×0.5). |
CC Automation Curves
Each clip can carry three automation lanes:
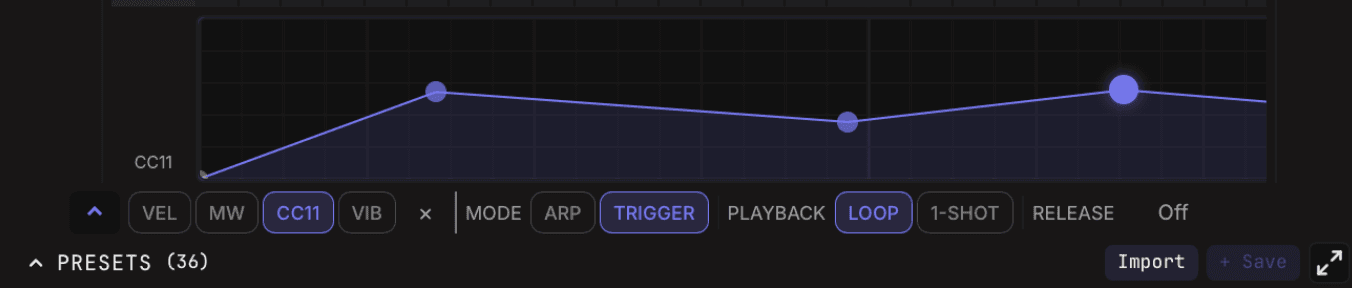
Mod Wheel (CC 1)
Spline-based curve with editable nodes. Automate vibrato depth or other mod wheel-mapped parameters.
Expression (CC 11)
Spline-based curve with editable nodes. Automate volume swells and dynamics.
Vibrato (CC 21)
Spline-based curve for libraries that map vibrato or similar performance controls to CC21.
As the clip's playhead advances, the curve value is read and sent as CC output.
Use Cases
Percussion Pattern Triggers
Load drum patterns into different slots with Trigger Out set to Fixed. Trigger them from dedicated notes—complex rhythms play on a single percussion hit.
Fixed Ostinatos per Keyswitch
Each keyswitch can have different clips—use this for evolving textures that change with your orchestration state.
Reharmonized Performances
Import a complex MIDI performance, enable arpeggiation mode, and play it live with any chord progression. The performance follows your harmony.
Related
Mailing list